

Croppie簡介
Croppie是一款基於HTML5和jQuery的圖片裁切套件 ,可以幫助我們快速的完成圖片上傳、裁切、壓縮,並且有很多選項可以自訂運用,以下會提供 DEMO 效果及範例程式碼。
官方範例網址:http://foliotek.github.io/Croppie/
網址內下方有提供教學文件,可以查看如何使用。
環境與版本
作業系統:Window10 64x 版本:2004
開發軟件(IDE):Visual Studio 2019 Community
.NET版本:ASP.NET Core 3.1
專案架構:MVC
在.NET CORE 在.NET CORE 上使用Croppie
範本網址
我們將逐步學習如何裁剪和調整圖像大小並將其存儲在文件夾中。

我們如今開發的每個應用程序都可以選擇設置個人資料照片。
在這一部分中,我們將允許用戶上傳照片,然後根據需要調整圖片的縮放比例,以其他格式調整圖像的大小並存儲在文件夾中。
- 200 * 200 護照尺寸
- 180 * 180 Facebook大小
- 32 * 32 圖標大小
所用NUGET包 和套件
ISixLabors.ImageSharp(NUGET包)
ImageSharp是一個新的,功能齊全,完全託管的跨平台2D圖形庫。為簡化圖像處理而設計的ImageSharp為您帶來了功能強大而又精美簡單的API。
Croppie
Croppie是一個快速,易於使用的圖像裁剪插件,具有大量的配置選項
從NuGet軟件包安裝SixLabors.ImageSharp擴展

在視圖上添加jQuery和Croppie CDN參考
<head>
  <meta name="viewport" content="width=device-width" />
  <title>CustomCrop</title>
  <link href="~/lib/bootstrap/dist/css/bootstrap.css" rel="stylesheet" />
  <script src="~/lib/jquery/dist/jquery.js"></script>
  <link rel="stylesheet" href="https://cdnjs.cloudflare.com/ajax/libs/croppie/2.6.5/croppie.min.css" />
  <script src="https://cdnjs.cloudflare.com/ajax/libs/croppie/2.6.5/croppie.min.js"></script>
  <style>
        .croppie-container {
            width: 100%;
            height: 80%;
        }
   </style>
</head>
初始化Croppie並讀取文件內容
<script type="text/javascript">

    //初始化Croppie
    var basic = $('#main-cropper').croppie
    ({
        viewport: { width: 300, height: 300 }, // 裁切區塊
        boundary: { width: 500, height: 400 }, // 預覽區塊
        showZoomer: true, //隱藏或顯示縮放滑塊
        url: '/DefaultImages/preview.jpg', //預設圖片
        format:'png' //'jpeg'|'png'|'webp'
    });

    //讀取上傳指定的檔案 顯示在框中
    function readFile(input) {
        if (input.files && input.files[0])
        {
            var reader = new FileReader();

            reader.onload = function (e) {
                $('#main-cropper').croppie('bind', {
                    url: e.target.result
                });
            }
            reader.readAsDataURL(input.files[0]);
        }
    }

   // 當change 事件發動了以後 閱讀上船的文件內容
    $('#select').on('change', function () { readFile(this); });

</script>
添加Controller後端處理方法
在這一部分中,我們將創建操作方法,該方法將在接收到裁剪文件的地方處理ajax POST請求。
讀取裁剪文件流後,我們將其傳遞給ImageSharp加載方法,該方法將在圖像對像上返回圖像對象,我們可以對圖像調整大小然後將其存儲在文件夾中。
我們將把Image存儲在一個文件夾中,因為我們將在wwwroot中使用Name Images創建一個文件夾。
我們將在3個不同的大小來調整圖像200,180,32。
[HttpPost]
        public IActionResult CustomCrop(string filename, IFormFile blob)
        {
            try
            {
                using (var image = Image.Load(blob.OpenReadStream()))
                {
                    string systemFileExtenstion = filename.Substring(filename.LastIndexOf('.'));

                    image.Mutate(x => x.Resize(180, 180));
                    var newfileName180 = GenerateFileName("Photo_180_180_", systemFileExtenstion);
                    var filepath160 = new PhysicalFileProvider(Path.Combine(Directory.GetCurrentDirectory(), "wwwroot", "Images")).Root + $@"\{newfileName180}";
                    image.Save(filepath160);

                    var newfileName200 = GenerateFileName("Photo_200_200_", systemFileExtenstion);
                    var filepath200 = new PhysicalFileProvider(Path.Combine(Directory.GetCurrentDirectory(), "wwwroot", "Images")).Root + $@"\{newfileName200}";
                    image.Mutate(x => x.Resize(200, 200));
                    image.Save(filepath200);

                    var newfileName32 = GenerateFileName("Photo_32_32_", systemFileExtenstion);
                    var filepath32 = new PhysicalFileProvider(Path.Combine(Directory.GetCurrentDirectory(), "wwwroot", "Images")).Root + $@"\{newfileName32}";
                    image.Mutate(x => x.Resize(32, 32));
                    image.Save(filepath32);

                }

                return Json(new { Message = "OK" });
            }
            catch (Exception)
            {
                return Json(new { Message = "ERROR" });
            }
        }
為了生成唯一文件名,我們創建了以下方法。
   public string GenerateFileName(string fileTypeName, string fileextenstion)
 {
     if (fileTypeName == null) throw new ArgumentNullException(nameof(fileTypeName));
     if (fileextenstion == null) throw new ArgumentNullException(nameof(fileextenstion));
     return $"{fileTypeName}_{DateTime.Now:yyyyMMddHHmmssfff}_{Guid.NewGuid():N}{fileextenstion}";
 }
Ajax請求發布裁剪的圖像
$('#btnupload').on('click', function ()
{
basic.croppie('result', 'blob').then(function (blob)
{
var formData = new FormData();
formData.append('filename', 'FileName.png');
formData.append('blob', blob);
var myAppUrlSettings =
{
MyUsefulUrl: '@Url.Action("CustomCrop", "Demo")'
}
var request = new XMLHttpRequest();
request.open('POST', myAppUrlSettings.MyUsefulUrl);
request.send(formData);
request.onreadystatechange = function () {
// Call a function when the state changes.
if (this.readyState === XMLHttpRequest.DONE && this.status === 200)
{
var response = JSON.parse(request.responseText);
if (response.message == "OK")
{
alert('Photo Cropped Successfully!');
window.location.reload();
}
if (response.message == "ERROR")
{
window.location.reload();
}
}
}
});
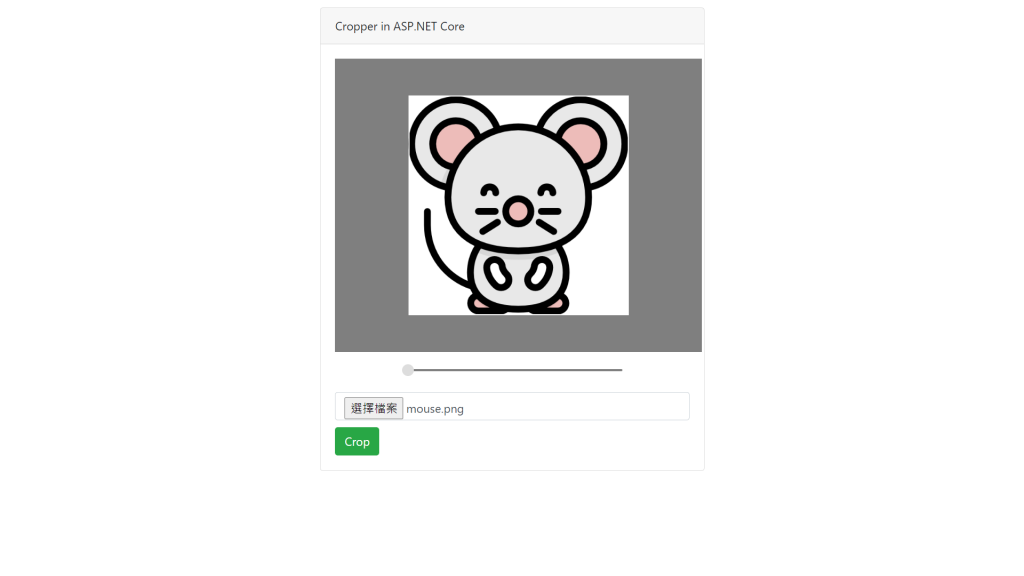
});上傳並裁剪圖像
需上傳圖像並調整圖像,然後單擊裁剪按鈕即可裁剪圖像。


裁剪後,圖像將存儲在文件夾中,如下所示。

參考或引用資料:
前端使用 JS 裁切圖片並壓縮再存到後端﹍Croppie 實作範例:https://www.wfublog.com/2020/08/jquery-croppie-image-cropper.html
[JS] Croppie 圖片上傳/裁切工具:https://medium.com/az-%E4%B8%8B%E7%AD%86%E8%A8%98/croppie-%E5%9C%96%E7%89%87%E4%B8%8A%E5%82%B3-%E8%A3%81%E5%88%87%E5%B7%A5%E5%85%B7-93c9a672edae
使用croppie.js裁剪和上傳照片ajax php jquery`:http://hk.uwenku.com/question/p-secsvsrb-bch.html
HOW TO CROP AND RESIZE IMAGE IN ASP.NET CORE:https://tutexchange.com/how-to-crop-and-resize-image-in-asp-net-core/
ASP.Net Core: Crop and Upload Image with Thumbnail using jQuery in ASP.Net Core MVC:https://www.aspsnippets.com/Articles/ASPNet-Core-Crop-and-Upload-Image-with-Thumbnail-using-jQuery-in-ASPNet-Core-MVC.aspx
![Read more about the article [JS作品]JS30系列04:Array Cardio Day 1 陣列的有氧運動](https://stevenjhu.com/wp-content/uploads/2019/12/錄製_2019_12_21_16_16_44_483-300x141.gif)
![Read more about the article [JS作品]JS30系列10-Hold Shift and Check Checkboxes 選單多重選取功能](https://stevenjhu.com/wp-content/uploads/2020/03/錄製_2020_03_21_18_19_47_66-300x169.gif)
![Read more about the article [MSSQL]MS SQL Transact-SQL 查出資料庫中所有索引的碎裂狀態並修復](https://stevenjhu.com/wp-content/uploads/2020/12/索引的碎裂狀態-300x169.jpg)